The Echo is one of the most versatile and novel gadgets to hit the market in recent years. The Alexa voice-assistant is the first of its kind. And Amazon certainly didn’t skimp on features. When it comes to playing music, it has many, many options to choose from. You can use Alexa to stream directly from sources such as Amazon Music, Prime Music, Spotify, Pandora and others. However, many don’t know how to get their current music library on Echo. So, we’ve put together a step-by-step on how to play iTunes music on Echo. It’s a little hacky, but follow this guide and you’ll be fine.
STEP 1: Setup Amazon Music (P.S. You’ve already done this.)
Every Amazon customer has access to Amazon Music for free.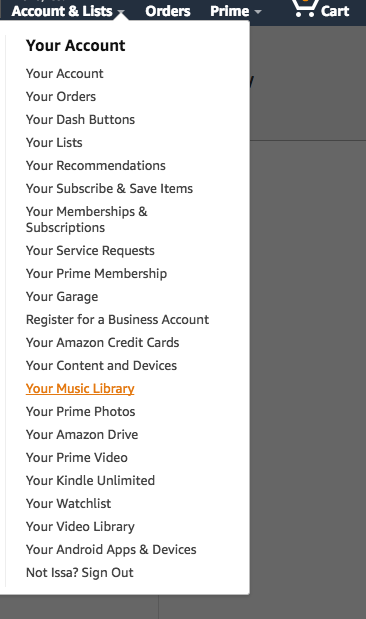
This is where we will put your music. To use a Music library, you must have an active Amazon account as mentioned. We recommend subscribing to Prime music or even Amazon Music Unlimited because it’s a great value, and all the music can be combined into one library. The cheapest plan is only $4 a month and there are other levels to choose from as well, but a paid subscription isn’t necessary.
 STEP 2: Pull your music down from The Cloud
If you’re planning to upload MP3s already saved on your local computer, you can skip this. But most of us use cloud services like iTunes and will need to save the songs locally. Save/download the songs from your iTunes library, or whichever service you use, to your local machine making sure to get album art, podcasts, everything. Obviously, this could take some depending on how many songs you have. Remember though, you can only upload 250 songs to Amazon Music unless you’ve paid the $25/year for the 250,000 song storage.
STEP 3: Remove the DRM from iTunes
Here’s the part that’s a little “hacky,” but is still totally legal and there are people out there who’ll do it for you. Any songs purchased from iTunes will be locked with DRM, Digital Rights Management, which has to be removed before your music will be playable through Amazon. The easiest, totally legit option is to pay $25 for a service like iTunes Match to do it for you, or DIY it and remove DRM yourself for free, this is a long process though, click here for a detailed guide on how to remove DRM from iTunes music by our friends over at lifewire. By the way, this works for movies too.
Step 4: Upload your iTunes music to the Amazon Music Library
This will take roughly the same amount of time it took to download your songs because you’re going to be uploading the same files to Amazon’s cloud.
Go to your Music Library on Amazon and click on the “Upload Your Music” link near the bottom of the left side navigation. You’ll be prompted to download the Amazon Music Uploader. Do it, it will make the upload process much easier. Once the uploader is downloaded, install and run it. There are two options now: Located and instruct the uploader which directory your music is in by choosing “files and folders,” or “Let Amazon find and upload your music”. The second option works well, but you may have songs you don’t want to upload, and this method doesn’t distinguish between those, so you’ll want to choose them yourself if that’s the case. Once you do this, that’s it. Let the uploader run, go have a snack, and come back for Step 5.
[Insert salty snack here]
STEP 5: Check upload for consistency and missing items
You always want to check that the upload worked correctly. Also, we recommend, as a precaution, that you don’t get rid of or delete the songs from your hard drive if you can spare the disk space. We’ve never encountered any issues with missing songs. At worst, we’ve had to reassign a few songs to the right album and cover art, but keeping the originals will help if anything does go wrong for you.
If you downloaded all the album information with the songs, Amazon Music should already have recreated the albums in your Music Library. If you find a few that are out of place, you can easily “Edit Song Info” with a simple right-click on the song title.
STEP 6: Play music on your Echo
You should be able to ask Alexa to play songs from your library right away assuming you have your Echo properly connected to your account already. As an added bonus, you can use multiple accounts on one Echo device, click here for a how to on using multiple accounts on one Amazon Echo.
“Alexa, play Amazon Music”
“Alexa, play Green Day from Amazon Music”
The Echo is a great device, but personalizing it makes it all the more rewarding and useful. While it may seem a little time-consuming to actually get your music library on Echo, it’s not difficult and is worth it in the end.