So, in the last installment of this series on the messaging protocol MQTT, we installed the Mosquitto MQTT broker. Now we’ll test it which we’re going to do on the same machine that Mosquitto is running on. First, you’re going to need to install the Mosquitto client tools:
sudo apt-get install mosquitto-clients
Now, let’s run Mosquitto from the command line:
root@deb-01:/home/mgibbs# mosquitto
1485602498: mosquitto version 1.3.4 (build date 2014-08-17 03:38:31+0000) starting
1485602498: Using default config.
1485602498: Opening ipv4 listen socket on port 1883.
1485602498: Opening ipv6 listen socket on port 1883.
The Mosquitto broker is now listening on the standard MQTT port, 1883, for both IPv4 and IPv6 MQTT requests. Next, open a new terminal window and enter:
mgibbs@deb-01:~$ mosquitto_sub -v -t ‘sensors’
The Mosquitto subscriber is now waiting for messages with the topic sensors. Without the -v option the subscriber will only print the payload while with it, the subscriber prints both the topic and payload (this is really more useful if you subscribe to # which is the everything topic we discussed in the first part of this series). And, perhaps obviously, the -t option followed by a string determines the topic. Now, in another terminal window, enter:
mgibbs@deb-01:~$ mosquitto_pub -t 'sensors' -m 'helloWorld'
mgibbs@deb-01:~$
And the second terminal window will now look like:
mgibbs@deb-01:~$ mosquitto_sub -v -t 'sensors'
sensors helloWorld
Ta-da! We’ve just sent and received our first message using the Mosqitto MQTT broker. Now, how about setting up a message generator? The easiest way to do this is with a little Python coding. Assuming you have Python already installed then you need to install the open source Eclipse Paho MQTT Client library for Python (libraries are available for other languages as well):
RedQueen:mqttgen mgibbs$ pip install paho-mqtt

Collecting paho-mqtt
  Downloading paho-mqtt-1.2.tar.gz (49kB)
    100% |████████████████████████████████| 51kB 316kB/s
Building wheels for collected packages: paho-mqtt
  Running setup.py bdist_wheel for paho-mqtt ... done
  Stored in directory: /Users/mgibbs/Library/Caches/pip/wheels/fa/db/fb/b495e37057e2f40534726b3c00ab26a58fc80fb8d17223df07
Successfully built paho-mqtt
Installing collected packages: paho-mqtt
Successfully installed paho-mqtt-1.2
RedQueen:mqttgen mgibbs$
Note that the Mosquitto clients and the Eclipse Paho MQTT Client libraries also work on Raspbian so you can move your Mosquitto client testing and development on Raspberry Pis and, as we’ll discuss later, you can even run the Mosquitto broker on a Raspberry Pi.
The MQTT generator we’ll use is called mqttgen.py created by Mariano Guerra. Here’s the code:
#!/usr/bin/env python3
"""a simple sensor data generator that sends to an MQTT broker via paho"""
import sys
import json
import time
import random

import paho.mqtt.client as mqtt

def generate(host, port, username, password, topic, sensors, interval_ms, verbose):
    """generate data and send it to an MQTT broker"""
    mqttc = mqtt.Client()

    if username:
        mqttc.username_pw_set(username, password)

    mqttc.connect(host, port)

    keys = list(sensors.keys())
    interval_secs = interval_ms / 1000.0

    while True:
        sensor_id = random.choice(keys)
        sensor = sensors[sensor_id]
        min_val, max_val = sensor.get("range", [0, 100])
        val = random.randint(min_val, max_val)

        data = {
            "id": sensor_id,
            "value": val
        }

        for key in ["lat", "lng", "unit", "type", "description"]:
            value = sensor.get(key)

            if value is not None:
                data[key] = value

        payload = json.dumps(data)

        if verbose:
            print("%s: %s" % (topic, payload))

        mqttc.publish(topic, payload)
        time.sleep(interval_secs)


def main(config_path):
    """main entry point, load and validate config and call generate"""
    try:
        with open(config_path) as handle:
            config = json.load(handle)
            mqtt_config = config.get("mqtt", {})
            misc_config = config.get("misc", {})
            sensors = config.get("sensors")

            interval_ms = misc_config.get("interval_ms", 500)
            verbose = misc_config.get("verbose", False)

            if not sensors:
                print("no sensors specified in config, nothing to do")
                return

            host = mqtt_config.get("host", "localhost")
            port = mqtt_config.get("port", 1883)
            username = mqtt_config.get("username")
            password = mqtt_config.get("password")
            topic = mqtt_config.get("topic", "sensors")

            generate(host, port, username, password, topic, sensors, interval_ms, verbose)
    except IOError as error:
        print("Error opening config file '%s'" % config_path, error)

if __name__ == '__main__':
    if len(sys.argv) == 2:
        main(sys.argv[1])
    else:
        print("usage %s config.json" % sys.argv[0])
If you’re running this generator on the same machine as your Mosquitto broker, then no configuration file is required, otherwise, you’ll need to set one up to at least specify the target server. Here’s one I’m using:
{
    "mqtt": {
        "username": "",
        "password": "",
        "host": "192.168.0.50",
        "port": 1883,
        "topic": "sensors"
    },
    "misc": {
        "interval_ms": 1000,
        "verbose": false
    },
    "sensors": {
        "Sensor 129": {
            "range": [0, 100]
        },
        "Sensor 229": {
            "range": [0, 100]
        },
        "Sensor 329": {
            "range": [0, 100]
        },
        "Sensor 429": {
            "range": [0, 100]
        },
        "Sensor 529": {
            "range": [0, 100]
        }
    }
}
As you can see, the configuration file is a simple JSON specification. You can set the rate at which messages are generated by changing the value of interval_ms and add as many items in the sensors section as you need. The range value, here that’s [0, 100] will result in a random value between 0 and 100 being assigned to the message and, again, you can tailor the range to your requirements. To start the generator, enter:
RedQueen:mqttgen mgibbs$ python mqttgen.py config50.json
… and unless you set the value of verbose in the configuration file to true, there won’t be any output to the terminal window. On the other hand, this what you’ll see in the Mosquitto subscriber terminal window:
mgibbs@deb-01:~$ mosquitto_sub -v -t 'sensors'
sensors helloWorld
sensors {"id": "Sensor 529", "value": 91}
sensors {"id": "Sensor 429", "value": 47}
sensors {"id": "Sensor 429", "value": 72}
sensors {"id": "Sensor 129", "value": 20}
sensors {"id": "Sensor 329", "value": 97}
sensors {"id": "Sensor 429", "value": 43}
sensors {"id": "Sensor 529", "value": 46}
sensors {"id": "Sensor 529", "value": 4}
sensors {"id": "Sensor 529", "value": 50}
sensors {"id": "Sensor 229", "value": 11}
sensors {"id": "Sensor 529", "value": 49}
sensors {"id": "Sensor 329", "value": 57}
sensors {"id": "Sensor 429", "value": 31}
sensors {"id": "Sensor 429", "value": 26}
sensors {"id": "Sensor 229", "value": 89}
sensors {"id": "Sensor 329", "value": 78}
...
That’s a good place to start exploring and testing MQTT and Mosquitto but if you want to get even more sophisticated in monitoring your MQTT traffic you need to install mqtt-spy.
mqtt-spy GUI console
mqtt-spy is a GUI-based “JavaFX application, so in theory should work on any operating system with an appropriate version of Java 8 installed.” You can also install the mqtt-spy-demon which dispenses with the GUI so you drive the application purely from the command line. mqtt-spy is a fantastic tool that not only allows you to do simple subscribe and publish operations; it can also use JavaScript scripts to generate and interact with messages. Among many other features, mqtt-spy also logs message traffic, decodes and reformats content, replays logged messages, graphs traffic, and supports multiple broker connections. It’s a great toolkit for serious MQTT engineering.
Earlier I mentioned instalingl the Mosquitto broker on a Raspberry Pi and I recommend following Installing Mosquitto on a Raspberry Pi, a blog post by Jan-Piet Mens but note that using a Raspberry Pi as a broker would only be useful where messaging volumes are low.
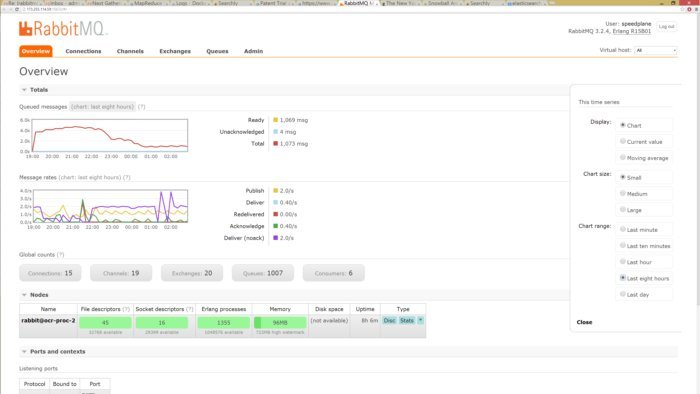
The RabbitMQ web console
An article by Tobias Abarbanell discusses how he used another MQTT broker, RabbitMQ (which is more sophisticated than Mosquitto and has a great GUI front-end), on a Raspberry Pi and noted:
If you let a publisher with a simple “hello world” message run in a loop for 1000 times and start a subscriber for this queue at the same time, you will see the 1000 messages flying through your little Rabbit Pi in about 13 seconds, more than 50 messages per second!
You will also notice that there is hardly any concurrency between the publisher and subscriber, so the messages only get consumed when the publisher gets idle. This is contrary to what I see on a desktop linux system where the subscriber always “wins” and keeps the queue empty, and the publisher is slowed down to the pace of the subscriber.
On the other hand, despite the performance limitations, using an RPi as a local hub for a small IoT device subgroup that’s part of a larger system could be a good architectural choice where field communications are limited and messaging volume are not excessive.
By the way, Mens is also responsible for authoring the smartphone app OwnTracks, a really interesting tool that:
… allows you to keep track of your own location. You can build your private location diary or share it with your family and friends. OwnTracks is open-source and uses open protocols for communication so you can be sure your data stays secure and private.
OwnTracks message handling and routing are a great use case for an MQTT broker such as Mosquitto and I plan to cover OwnTracks in a future post.
If you’re using Mosquitto, whether it’s for IoT purposes or in another context or if you have any questions or thoughts about IoT messaging, let me know.
Comments? Thoughts? Drop me a line then follow me on Twitter and Facebook. And sign up for my new newsletter!