If you’re looking to turn your existing home appliances into smart home appliances, the iDevices Smart Home Essentials Kit has pretty much everything you need. It comes with three light sockets and seven plug-in switches that are Wi-Fi enabled and can be controlled from a smartphone without the need for a home automation hub. Each component can be managed individually or in a group, and they all work with Apple’s HomeKit platform and respond to Siri and Amazon Alexa voice commands. That said, installation was problematic in our tests, and the kit’s $499.95 price is more than what you’ll pay for competing smart home components.
Components
The Essentials Kit comes with three sockets, five wall switches, and two outdoor switches, all of which contain radios that support 802.11b/g/n Wi-Fi and WPA/WPA2 security. If purchased separately, the sockets are $59.95 each, the switches are $49.95 each, and the outdoor switches are $79.95 each. Purchasing them in the Essentials Kit represents a $90 savings.
The socket is a light bulb adapter that is 2.9 inches long and 2.4 inches in diameter. It has an E26 base that screws into any lamp and a socket that accepts standard E26 bulbs. You can use incandescent, CFL, LED, or halogen bulbs, but in order to use the dimming feature they must be dimmable. At the top of the socket is an LED light ring that changes colors during installation and serves as a multi-color nightlight, and there’s a button on the side that is used to manually turn the socket off. Pressing and holding the button until it blinks red will reset the device.
The indoor wall switch is white and tan and measures 1.5 by 2.7 by 1.6 inches (HWD). It plugs into any three pronged outlet and has a multi-colored LED nightlight strip on the front, a single three-pronged outlet on the left side, and an on/off button of the right that also resets the switch when pressed until the LED strip blinks red. As with the Belkin WeMo Insight Switch and Zuli Smartplug, the iDevices switch has a built-in power meter that measures average power consumption and average energy costs. It also tells you the average time of use.
The outdoor switch is housed in a black weather-resistant casing that measures 6.0 by 2.8 by 1.9 inches (HWD) and weighs 1 pound. It has two three-pronge outlets on the bottom, a thin 2.2-inch-long LED strip on the front, and a three-pronge power cord on top that is 7.5 inches long. The left side has a button for resetting the switch and manually turning it on and off, and the back has a mounting hole for hanging the switch on a wall or a fence post. While it’s nice to have dual outlets, it would be even nicer if they were independent of one another, which would allow you to separately control two devices. As with the wall switch, the outdoor switch monitors energy usage and costs. iDevices also sells a smart wall outlet ($299.85 for a three-pack) and a smart thermostat ($129.95), both of which can be controlled using the well-designed Android or iOS app.
App and Features
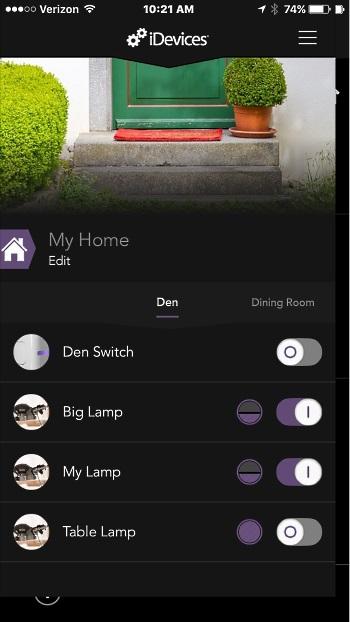
The iDevices Connected app is free and uses photo icons for easy navigation. It opens to a My Home page that displays rooms and a list of each connected device in each room. To the left of the device name is a photo of the device, and to the right are an on/off button and a brightness indicator (for sockets).
Tapping on any device opens a page with controls and detailed information; the socket page has an on/off button for the light, a brightness slider, and an on/off button for the nightlight. Here you can also select a color for the nightlight as well as brightness and saturation levels. The indoor and outdoor switch pages are nearly identical; they both have on/off buttons and display average energy consumption, average time used, and average estimated power cost. The outdoor switch doesn’t have nightlight settings but the wall switch does.
Each device also has a Scenes/Schedules option that allows you to schedule on/off times or include the device in a Scene that allows you to control multiple devices simultaneously. For example, you can create a Movie Night Scene that has your living room or den lights dim to a preset brightness level.
In the upper right corner there are three bars; tap them to assign devices to Zones and Rooms. Zones consist of one or more Rooms that you want to control all at once, such as upstairs or downstairs. You can assign devices to specific Rooms in the house, such as the den or the kitchen. Tap the Products icon to control sockets, switches, and nightlights all at once. For example, when you hit the off button for switches, every switch in the house will turn off. Here you can also create Scenes and Schedules, use the Add Products button to pair new components, and view energy reports for each switch. The Settings page is where you go to enter values for the energy cost monitor and set up Alexa voice commands.
In addition to the app, you can use Alexa and Siri voice commands to control iDevices components. Simple voice commands will turn components on and off and you can enable a Scene whenever you like by simply saying “Siri, movie night,” or “Alexa, turn off den.” However, you can’t trigger components with If This Then That (IFTTT) recipes like you can with the Belkin WeMo Insight Switch and various lighting systems from LIFX, Philips, and Stack Labs.
Installation and Performance
I ran into a couple of roadblocks while installing the components. I used a web browser to log in to the iDevices site to activate the kit. You can choose the Concierge-Guided or Self-Guided setup method; if you choose Concierge-Guided, you’ll be asked to schedule a call with a technician who will walk you through the installation procedure and provide tips on how to best use each component. I chose the Self-Guided option in which you use the printed install guide and in-app instructions to set up the system, but you can always call tech support if you have trouble along the way.
Once activated, I downloaded the app and began adding devices. Each device comes with a Quick Start Guide that offers illustrated instructions for connecting it to your home Wi-Fi and adding it as a HomeKit device.
 I started by screwing a socket into a desktop lamp. It began blinking blue and immediately showed up in the app. I clicked the plus icon next to the socket name, selected my network SSID, and waited around 10 seconds for the socket to join my network, at which time the light ring went solid blue. The app then did a quick search and found the socket, but when I tapped it to add it to HomeKit, I received an Error 77 message stating that the identity attempt failed due to a cloud data sync in progress. A quick Google search confirmed that this is a common error that could be resolved by resetting the Apple Home app and resetting the socket. Once reset, the iDevices app found the socket, prompted me to scan the HomeKit code, and added the socket to the My Home menu.
When I went to install the second socket, I received an Error 52 message that required me to reset the Wi-Fi on my phone, reset the socket, close the iDevices app, reopen it, and reinstall the socket. This time around I was able to scan the HomeKit code and add the socket to My Home. I had the same problem with the third socket. The procedure for installing the indoor and outdoor switches was identical, and I encountered the Error 52 message with each installation. However, I didn’t have to go through the Wi-Fi and switch reset process; I simply clicked OK on the error message and proceeded to the HomeKit pairing screen.
Once all of the sockets and switches were installed the system worked perfectly. Each switch responded instantly to on and off commands made using the app and followed all of my Schedules. I grouped my components according to the rooms in which they were installed, and they all reacted immediately when I used voice commands to turn off a room or an entire zone. Voice commands to raise and lower the brightness level of lights installed in the sockets also worked wonderfully.
Conclusions
The iDevices Smart Home Essentials Kit is a good choice for anyone who wants to smarten up their home with controlled lighting and smart switches that they can control from one app, without the need for a hub. Once I got past the annoying error messages during installation, each component worked wonderfully, whether managed via the app or by Alexa and Siri voice commands. The app is easy to use, and allows you to control devices individually, by group, or with scenes and Schedules.
That said, you’ll save a good chunk of change and gain functionality by purchasing various other smart home devices a la carte. Philips Hue White bulbs, for instance, cost $15 each, which is well under the $40 or so you’re paying here, even when you factor in the price of a hub across multiple bulbs. The Belkin WeMo Insight Switch costs the same as the iDevices switch, meanwhile, and works with the Nest Thermostat, IFTTT recipes, and is a lot easier to install. So if you’re willing to do a little research and use more than one platform, it pays to shop around.